Showing posts with label diy. Show all posts

Saturday, March 5, 2011

Have you heard of ....

PhotoBookGirl?

Well, she's pretty flipping amazing and makes the world of photobooks a little easier to navigate!
If you are even thinking about making a photobook, you want to check her out.
  • Reviews - different photobooks available from the different publishers.
  • 'Photobook Wizard' - walks you through finding which company has the details you want for your photobook.<--Time saver!!!
  • Coupons/Deals - lists the most current deals for different companies
Right now, she has a pretty cool giveaway in celebration of PhotobookGirl.com's 1st birthday: MyPhotoCreations giveaway.
Got to love it when the birthday guests have a chance at the gifts!

Check it out. The contest ends on March 7th at 11:59 p.m.

Sunday, September 12, 2010

DIY Checks!

I finished my cake topper! WOOT!

I finally finished a mock-up of my invitations! WOOT!! WOOT!!

I made everything. I got the idea of the double-sided pocket from knottie lreeder. She even supplied some directions and measurements that she used. I eventually came up with my own measurements as I was designing. I believe I'll be printing at home and having them cut at Fedex Kinko's. They charge $1.50 a cut, but you have to remember that's through a ream of paper.

1. the invite
I want to darken the wine shade of our names and am on the look-out for a different stamp to emboss on the side.
2. the backside of the pocket
I ended up with 3 enclosures: R.S.V.P., Reception and Accommodations. The monogram square will be larger; I just got tired last night and wanted to have an idea of what it would look like!
3a. first insert: R.S.V.P.
I have already enlarged and bolded the "We're taking requests" in the bottom right corner. FH didn't notice it and thought others might not know to flip over.3b. first insert backside: Requests
I put a place for guests to request songs they'd like to hear at the reception. I also got an alternate idea for the traditional slideshow played during the reception from another knottie. I put that information on this side as well.

4. second insert: Reception
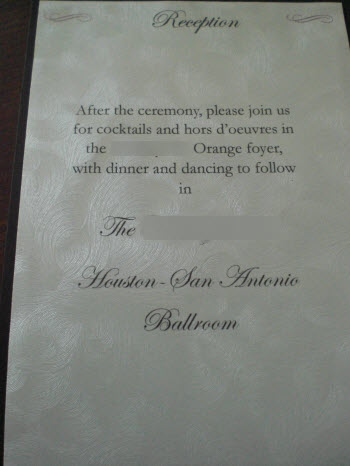
I just made a reception card that lets guests know they will move to a cocktail hour in a different part of the hotel and then to the ballroom for dinner and dancing.
5. third insert: Accommodations
This card includes the information on the room block. I don't have the specific rates or deadline yet, so I'll add those later.
Can you see the pretty swirlies on the metallic paper?!?

I am quite pleased with it. I hope to get the missing information this week and start cranking these puppies out. I bought a circle cutter from Micheal's yesterday and plan to make the pockets this week. I have between now and September 30th to get everything printed, cut, stamped & embossed and matted. I'll be going home the 1st weekend in October and plan to stuff and stamp then. I'm such a control freak that I will probably just do the mounting to the cardstock backing myself!

Tuesday, August 10, 2010

Wrap-around Labels

Well, I had my Save the Dates, so I needed to get them stuffed, labeled, stamped and put in the mail ASAP. (As of press time, I have one batch out, a second batch in the works and a few more addresses needed.)
I went to my hometown for my mom's 35th high school class reunion weekend; that Sunday night my mom, aunt and I got to work. They put the cards in the envelopes while I tried to decide if I was going to line the envelopes or not.

Ended up going with not. It was late and I didn't have a lot of envelopes, so I scrapped it. I had also considered stamping and embossing them, but they just were not coming out like I wanted them, so that was scrapped as well. Next, they added the adhesive magnet to the back of the business cards. It was justthismuch longer (or wider, I guess) than the business card, but it was quite easy to trim that little edge.

While they did that, I finished my wrap-around labels. I modeled my template after the DIY bride and this is what they looked like:
Simple directions:
1. Open a new document in Microsoft Word.
2. I got rid of all of my margins and then inserted a text box. My final size after tinkering was 1.43 x 7.03.
3. I inserted 2 more text boxes - one for the guests' addresses and one for our return address. I changed the text direction for the return address just because, you don't have to.
4. I made a template with generic wording to determine my font and size and inserted my monogram that I'd previously saved as a .jpg. You can add any design, background or flourish that you'd like. I left the the light outline around the large box to aid in cutting; you could alternatively go with no outline.
5. I then held down the control key (ctrl) and clicked on all four pieces (you may have to do this a couple of times; Word can be temperamental, ha) and then I grouped the elements as one.
6. I then copy and pasted the labels and was able to get 6 to a page.
7. Filled them out, saved each page as STDlabels1, STDlabels2, etc and printed on my HP wireless. Cut out about 3 pages at a time w/ my paper cutter and ran them through my Xyron.

Easy-peasy.

Sunday, July 25, 2010

STD - Ch-CH-CHECK!!!

Whee and WOOT! They are designed and ordered. I think they are cute. What do you think? (Lie to me if you don't like them because I've already ordered them.
I designed them on Microsoft Word and SnagIt Editor and saved as a .pdf according to the specifications from Vistaprint. I also ordered a business card version. I might get the adhesize magnet backing for them. Here it is, too.

Sunday, June 13, 2010

Frick. 188 days...

Well, how did that happen?!? It's time for me to buckle down and get back on this planning thing. I didn't "stop," but I certainly did slow down. But (*singing*) school's out for summer!

***UPDATE***
I plan to get going on my DIY projects. I have purchased a lot of items over the last couple of months and have just placed everything in what is slowly turning into the wedding room.

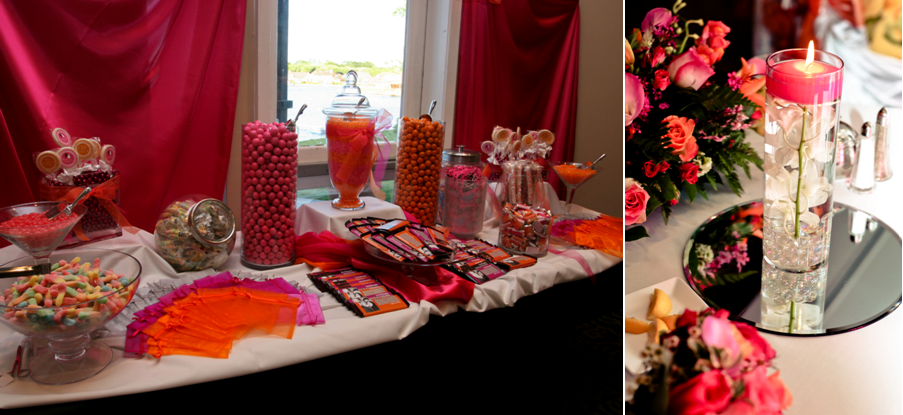
A newly married bride in the Houston area was selling her candy bar set-up and 10 cylindrical vases. I jumped in and snapped those up! What do you think?

I'm quite excited! I have more than enough containers now and the scoops/tongs.
I have everything I need to paint my banners and aisle runner. I am just waiting on someone from the hotel to let me know the length of the aisle. sigh. More about them in the next post. Here is my trial Here Comes the Bride banner:
More posting. more frequently!
Let's go!!!
<3 CRod

Monday, March 8, 2010

1st DIY check! WOOT!!!

What is DIY? Do-It-Yourself. Thanks to the knotties and their wonderful bios, I have created quite an extensive diy list. A few things I plan to do are invitations, save the dates, monogrammed aisle runner, sweetheart table banner, reception decorations....the list definitely goes on and on. I also LOVE the Mrs. hoodie (and undies, but I haven't attacked those yet.) Anyhoo, a knottie posted that Old Navy had white hoodies on sale for $10 about a week ago. It's this one.

I actually ordered 2 - one in white and one in purple. Didn't really care for the purple, but you can make returns at the store, so it's gone now. Now I have seen several versions of directions for creating your hoodie. They pretty much all involve the same things: making your pattern on the computer, printing it out so it's backwards, using mylar paper, attaching rhinestones and then ironing onto your hoodie. Here are some of the different directions I had saved to use as a possible guide: try these, or these and here is a video.

All of this was fine and dandy and how I planned to make my hoodie. But the thing is, you have to order this mylar transfer paper from online. (A lot of people get it from ebay.) I have a problem. When I decide I want something (or in this case, want to do something), I want to do it then!

I looked around thinking there must be something similar that I could use found in stores, but I actually had no luck. (I did later find this link from someone, but I had already completed my hoodie! She found something at Hobby Lobby that worked similarly to the mylar paper.) I had just about resigned myself to the idea that I was going to have to order the mylar transfer paper and just wait. yuck. And then I found a knottie (through a board search of 'hoodie') who did hers differently. Her directions are perfect - it's how I made mine after all - but here is how I did it.

You need:
your pattern/what you want it to say
tape
a pin
a pencil
iron-on rhinestones
iron or hotfix tool
teflon pressing sheet (optional)


I used the font Edwardian Script for the Mrs. Lastname and High Tower Text for the est. date and printed it out. I taped the paper down where I wanted the saying to be.


Then I took the straight pin (I actually used a thumbtack; easier to hold onto) and perforated my letters through the paper.


Next trace through the perforation/holes with your pencil. This will put your pattern on your fabric when you remove the paper. (Look closely; you can see the outline on my jacket.) Now just place your rhinestones, lining them up with the outline. I used a pair of tweezers I had already; no need for some special rhinestone grabber thingy (imho). I only did a letter (small ones) or part of a letter (if there were a lot of rhinestones) at a time, and would then iron that section before moving on. Just didn't want to end up with some out of line.


I laid the teflon pressing sheet on top of the section and held my iron (set according to the directions on the rhinestones) ON the letter for about 15 seconds. Don't rock; just place. Repeat until it's all done!

I did the initials on the front and like a complete dodo I put L + W, which are fiance's initials! Of course I did not realize this until I had completed the entire hoodie, so I just threw that C up there and kept it moving!

Jenny also changed out the white drawstring on her hoodie to a color that matched her colors on the hoodie. So I switched mine to one that is a wine color. Just as Jenny did, I just tied my new ribbon on one end of the white string, pulled the white through and the wine in and knotted the ends of the wine.

I am so happy with it!

<3 CRod